Visibility Conditions
Configure visibility for Beaver Builder modules, columns, and rows using display settings, conditionals, contact tags, contact field values, and PHP statements.
Display Settings
-
Within the Beaver Builder editor open the module/column/row for editing by clicking the wrench icon.
-
Within the Beaver Builder widget panel select the Advanced tab.
-
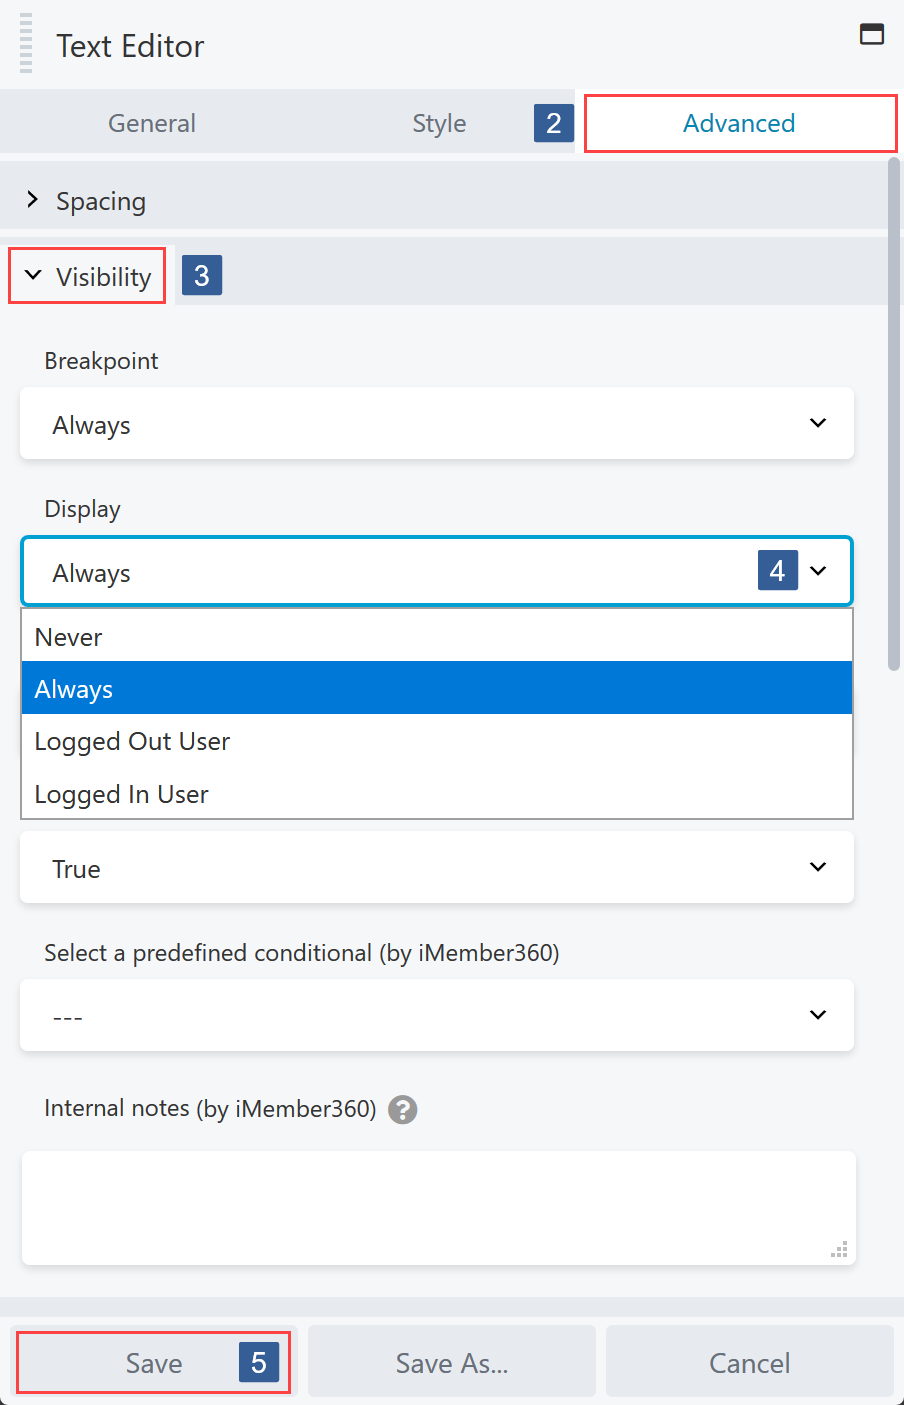
Navigate to the Visibility tab and expand it if necessary.
-
In the Display drop down select the required display setting.
The default Beaver Builder display setting is to Always display the selected module/column/row.
The other display setting options are Is Logged In, Not Logged In and Never.
infoIf you also have Beaver Themer active you will see an additional option to control the display of the module/column/row using Conditional Logic.
Please refer to Beaver Themer Integration for how to use iMember360 with Beaver Themer Conditional Logic.
iMember360 integrates with Beaver Themer Conditional Logic to control the display of modules/columns/rows so that iMember360 conditionals can be used with both AND and OR Beaver Themer Conditional Logic rules/rule groups.
-
Once the settings have been completed ensure Save is clicked to save the configuration.
iMember360 Conditional
-
Within the Beaver Builder editor open the module/column/row for editing by clicking the wrench icon.
-
Within the Beaver Builder widget panel select the Advanced tab.
-
Navigate to the Visibility tab and expand it if necessary.
-
Ensure the required module/column/row display has been specified as detailed in Display Settings.
-
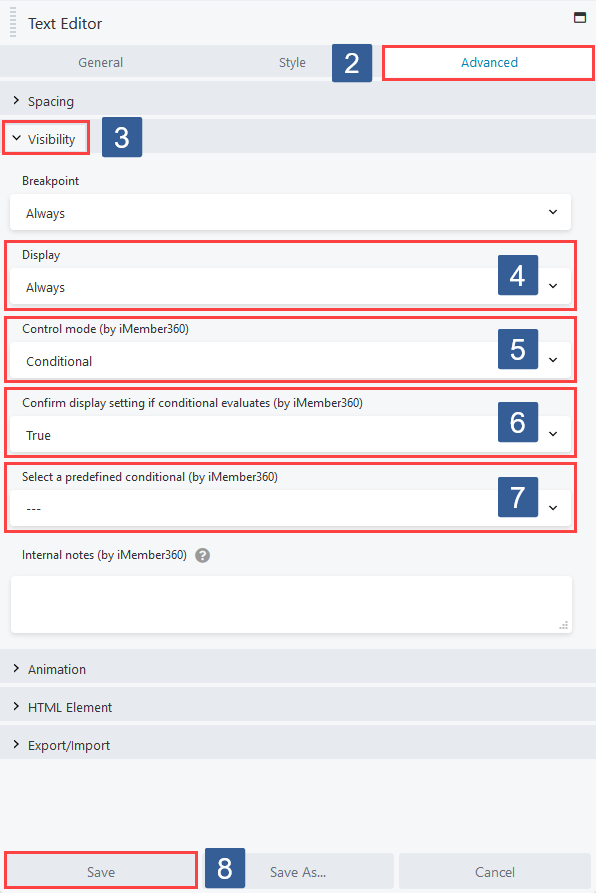
From the Control mode drop down ensure Conditional is selected.
-
From the Display if the conditional evaluates drop down select whether the conditional needs to evaluate as True or False to display the module/column/row.
-
From the Conditional drop down select the required conditional to be evaluated.
infoActive conditionals are shown in the drop down with the suffix of (publish).
-
Once the settings have been completed ensure Save is clicked to save the configuration.
Contact Tags

-
Within the Beaver Builder editor open the module/column/row for editing by clicking the wrench icon.
-
Within the Beaver Builder widget panel select the Advanced tab.
-
Navigate to the Visibility tab and expand it if necessary.
-
Ensure the required module/column/row display has been specified as detailed in Display Settings.
-
From the Control mode drop down ensure Individual is selected.
-
In the Tags (Any) selection area select the Keap tag(s) the user should have for this condition to evaluate as TRUE. The user can have any of the tags specified for the condition to evaluate as TRUE.
Click in the selection area and start typing part of the tag name to refine the list. Then click on the required tag.
Multiple tags can be selected.
Individual tags can be removed from the selection by clicking on the x shown next to the individual tag name.
infoThis Tags(Any) setting works in conjunction with the Tags(Not all) setting.
They work as AND conditions. So both must evaluate as TRUE for the visibility setting to have effect.
If any conditions evaluate as FALSE the module/column/row will not be visible.
-
In the Tags (Not all) selection area select the Keap tag(s) the user should not have for the condition to evaluate as TRUE. The user must have none of the tags specified for the condition to evaluate as TRUE.
Click in the selection area and start typing part of the tag name to refine the list. Then click on the required tag.
Multiple tags can be selected.
Individual tags can be removed from the selection by clicking on the x shown next to the individual tag name.
infoThis Tags(Not all) setting works in conjunction with the Tags(Any) setting.
They work as AND conditions. So both must evaluate as TRUE for the visibility setting to have effect.
If any conditions evaluate as FALSE the module/column/row will not be visible.
-
Once the settings have been completed ensure Save is clicked to save the configuration.
Contact Field Value
-
Within the Beaver Builder editor open the module/column/row for editing by clicking the wrench icon.
-
Within the Beaver Builder widget panel select the Advanced tab.
-
Navigate to the Visibility tab and expand it if necessary.
-
Ensure the required module/column/row display has been specified as detailed in Display Settings.
-
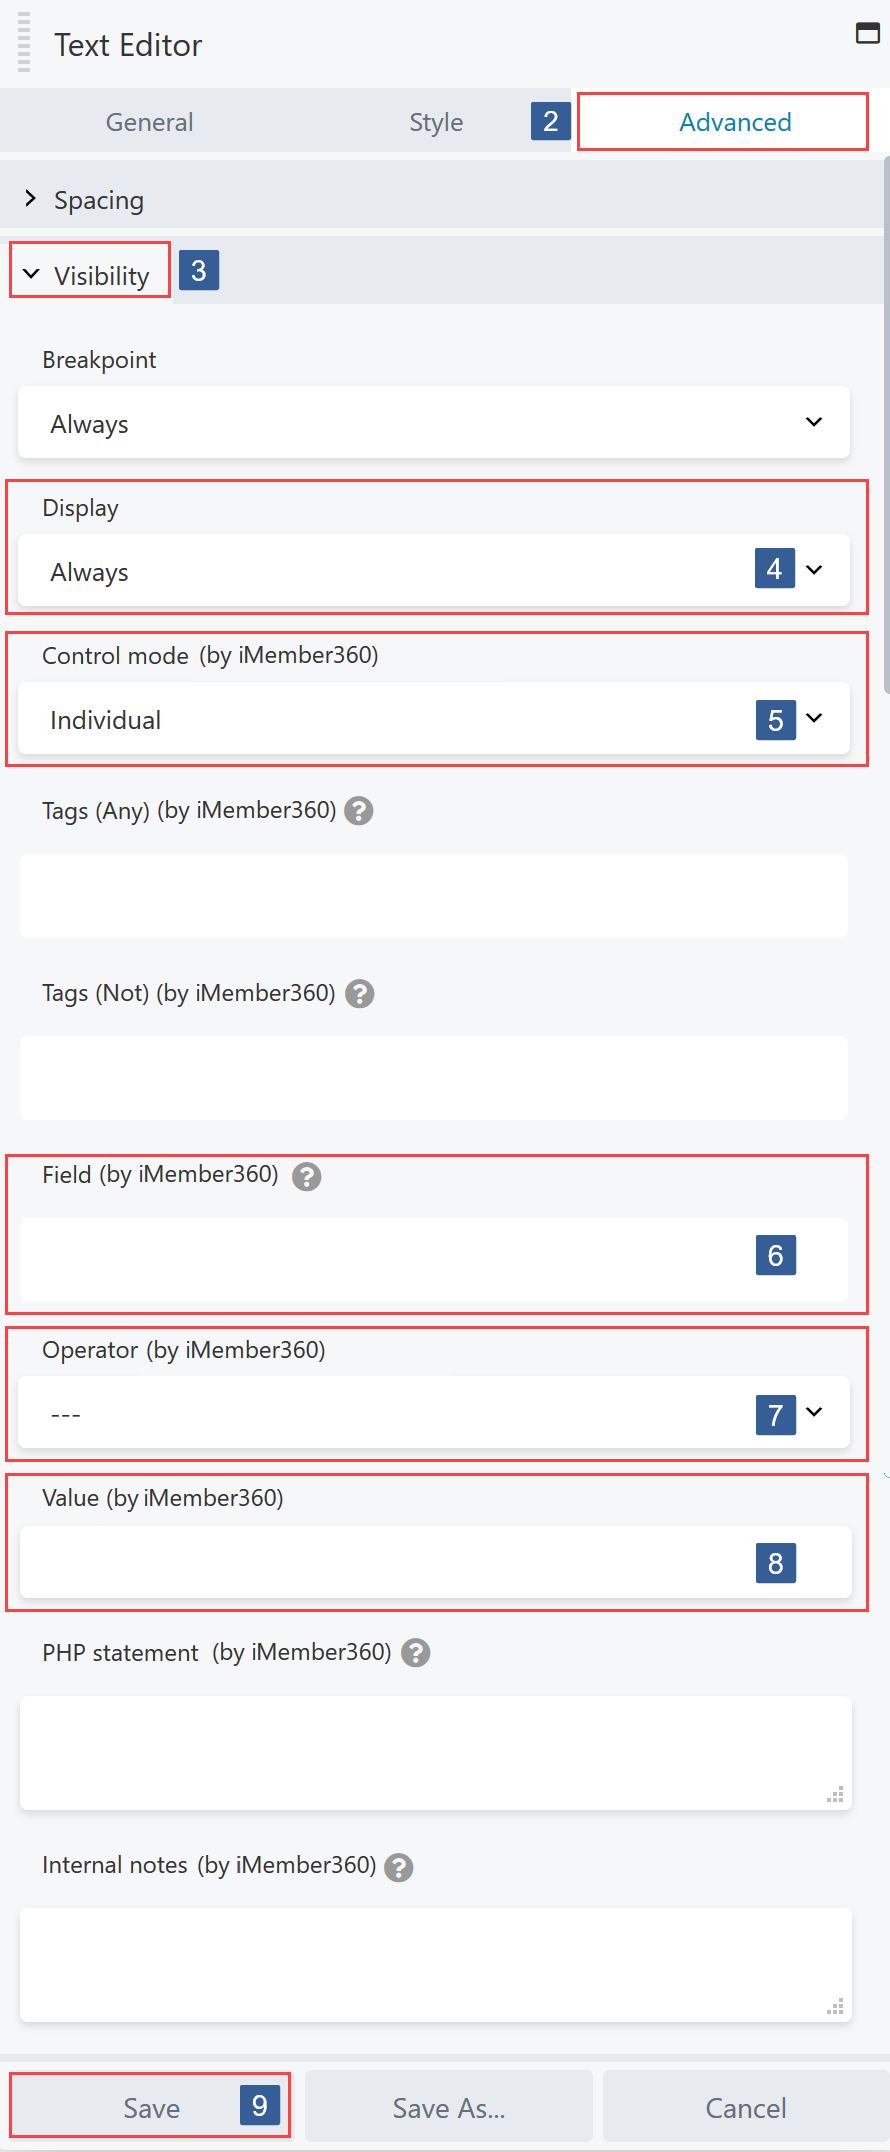
From the Control mode drop down ensure Individual is selected.
-
In the Field drop down select the Keap contact field to be used for the comparison.
Click the drop down then scroll or start typing the first characters of the contact field to aid selection.
Click on the required contact field.
-
In the Operator drop down select the comparison operator.
The comparison operators available are:
- — (None)
- Equals
- Not equal
- Greater than
- Less than
- Greater or equal
- Less or equal
- Begins with
- Ends with
- Contains
- Not contains
-
Specify the value to be used for comparison.
infoWhen entering a date it should be specified in the format that Keap stores the date e.g. yyyymmdd
-
Once the settings have been completed ensure Save is clicked to save the configuration.
PHP Statement
-
Within the Beaver Builder editor open the module/column/row for editing by clicking the wrench icon.
-
Within the Beaver Builder widget panel select the Advanced tab.
-
Navigate to the Visibility tab and expand it if necessary.
-
Ensure the required module/column/row display has been specified as detailed in Display Settings.
-
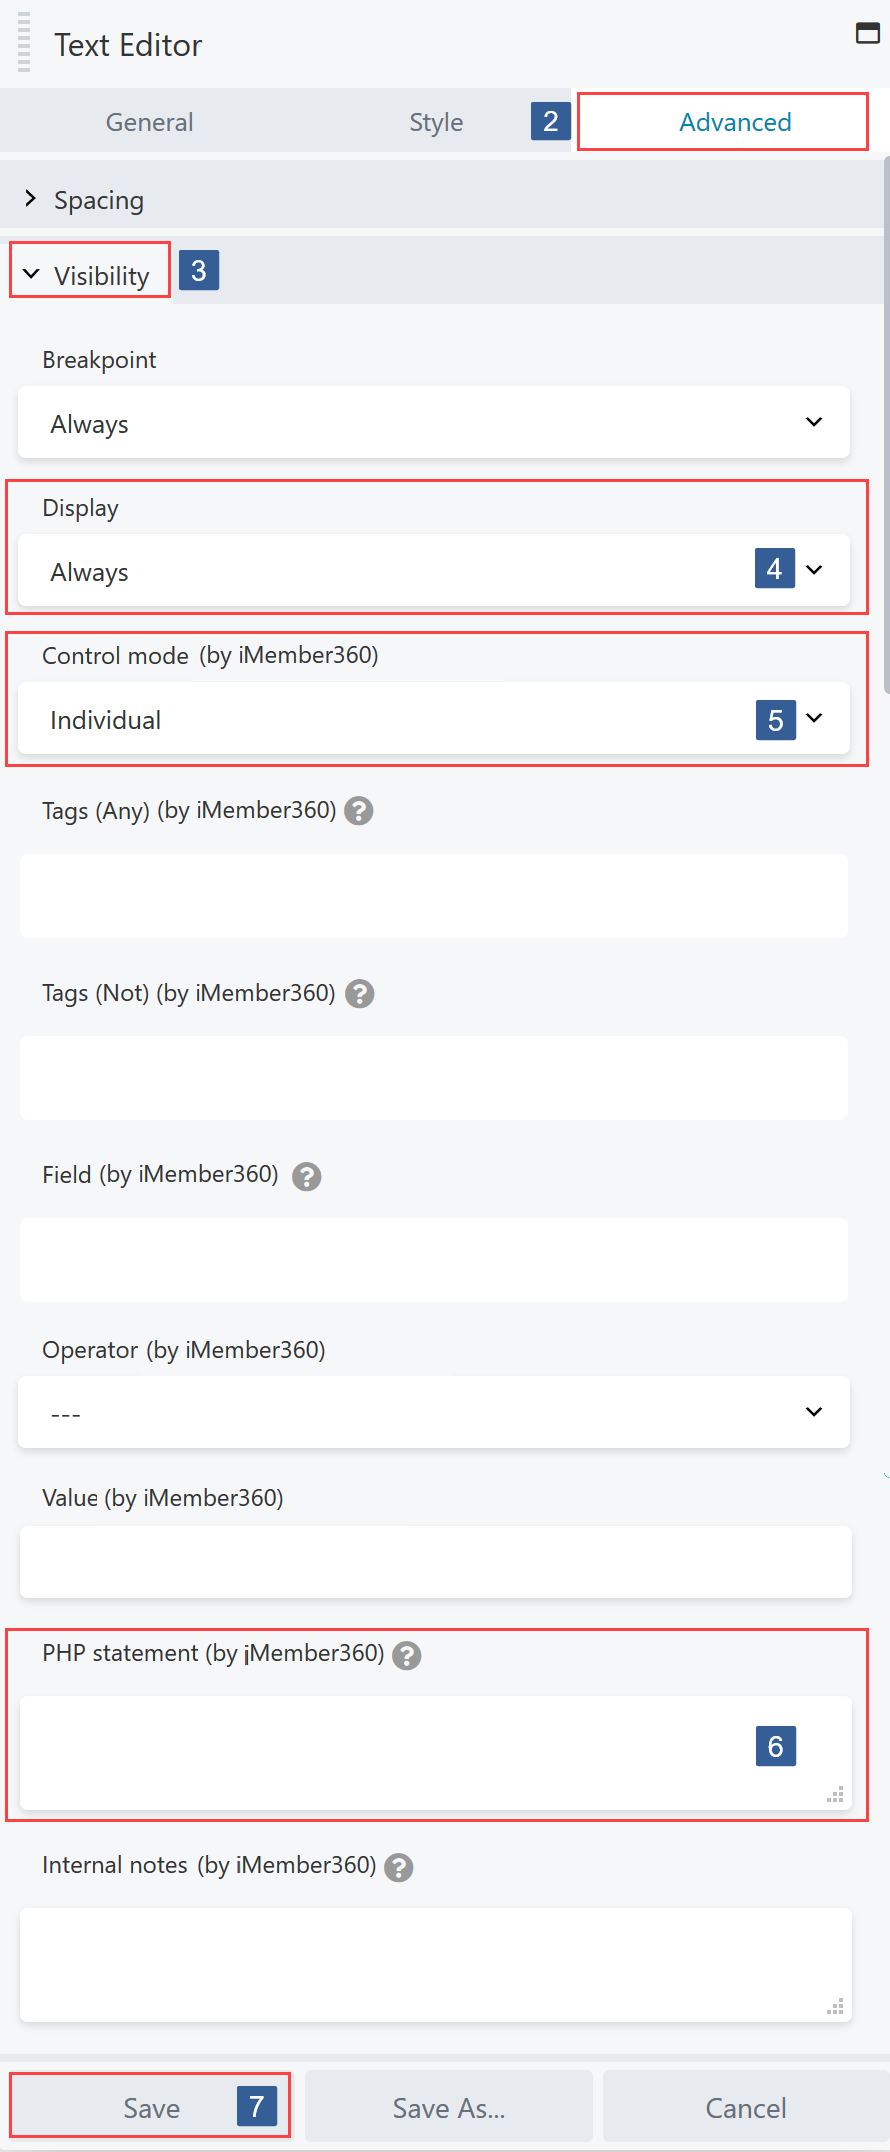
From the Control mode drop down ensure Individual is selected.
-
Define the PHP conditional statement.
Any valid PHP conditional function can be used.
iMember360 has conditional functions that can be used:
i4w_has_tags()
Here are some examples:
a. Statement evaluates as TRUE if the user HAS tag 123.
PHPi4w_has_tags( '123' )b. Statement evaluates as TRUE if the user HAS tag 123 OR 234.
PHPi4w_has_tags( '123,234' )c. Statement evaluates as TRUE if the user HAS tag 123 OR 234.
PHPi4w_has_tags( array(123,234) )d. Statement evaluates as TRUE if the user HAS tag 123 AND 234.
PHPi4w_has_tags( '123,234', 'all' )e. Statement evaluates as TRUE if the user HAS tag 123 AND 234.
PHPi4w_has_tags( array(123,234), 'all' )Any function preceded with an exclamation mark ! specifies the negative use case of the function.
f. Statement evaluates as TRUE if the user DOES NOT HAVE tag 123.
PHP!i4w_has_tags( '123' )It is also possible to combine conditions with && (representing AND) and || (representing OR).
g. Statement evaluates as TRUE if the user HAS tag 123 AND DOES NOT HAVE tag 234.
PHPi4w_has_tags( '123' ) && !i4w_has_tags( '234' )h. Statement evaluates as TRUE if the user HAS tag 123 OR DOES NOT HAVE tag 234.
PHPi4w_has_tags( '123' ) || !i4w_has_tags( '234' )You can also use any conditional tags including WordPress and WooCommerce conditional tags.
i. Statement evaluates as TRUE if this is the home page.
PHPis_home() -
Once the settings have been completed ensure Save is clicked to save the configuration.